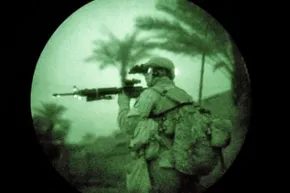
You picture a spy movie. The hero climbs a dark wall. No moon. Just blackness. Then the goggles snap on. Everything turns emerald green. The target is visible.
It looks like magic. But it’s physics.
Can you actually see in the dark? Yes. With the right gear, you can spot a person 200 yards away on a cloudy night. That is not a typo. That is 183 meters.
There are two ways this works. They are not the same. Most people confuse them.
- Image enhancement amplifies existing light. It grabs tiny photons. It boosts them until your eye sees something. It uses the lower end of the infrared spectrum.
- Thermal imaging detects heat. It does not care about light. It sees the upper end of the infrared spectrum. Hot bodies glow. Cool trees do not.
Before we break down the gear, we need to talk about the light source. Or lack thereof.
Understanding Infrared Light
Infrared light is invisible to human eyes. But it is everywhere. It is the heat signature of the world.
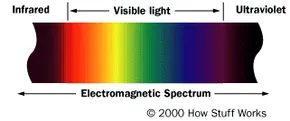
To grasp how night vision works, you have to look at light itself. Specifically, you need to understand the relationship between energy and wavelength. Shorter wavelengths carry more energy. Within the visible spectrum, violet light tops the list for energy while red sits at the bottom. Directly adjacent to visible light is the infrared spectrum.
This spectrum isn’t a monolith. It breaks down into three distinct categories, each with different properties and uses.
The Infrared Spectrum Breakdown
- Near-infrared (near-IR) sits closest to visible light. Its wavelengths range from 0.7 to 1.3 microns, which is 700 billionths to 1,300 billionths of a meter.
- Mid-infrared (mid-IR) covers wavelengths from 1.3 to 3 microns. Both near-IR and mid-IR are reflected light sources used by common electronics like remote controls.
- Thermal-infrared (thermal-IR) occupies the largest portion of the spectrum, spanning from 3 microns to over 30 microns.
The distinction here matters. Near and mid-IR are generally reflected. Thermal-IR is emitted.
Emitted vs. Reflected Light
Why does thermal-IR behave differently? It comes down to atomic activity.
Everything emits thermal infrared radiation because of what is happening at the atomic level. Atoms are never truly still. They vibrate, move, and rotate constantly. Even the atoms making up your chair are in motion. Solids are dynamic.
These atoms exist in various states of excitation. This simply means they possess different energy levels.
When you apply significant energy to an atom—whether through heat, light, or electricity—the atom can leave its ground-state energy level. It moves into an excited level. The degree of this excitation depends entirely on the amount of energy applied.
Atomic Structure and Energy Levels
An atom consists of a nucleus containing protons and neutrons, surrounded by an electron cloud.
Visualizing electrons circling the nucleus in discrete orbits helps explain energy transitions. While modern quantum mechanics rejects the idea of fixed planetary orbits, the model remains useful for understanding energy levels.
Think of these orbits as specific energy states. If you add heat to an atom, electrons in lower energy orbitals may transition to higher energy orbitals. They move farther from the nucleus. This shift in energy state is what drives the emission of infrared radiation, particularly in the thermal range.
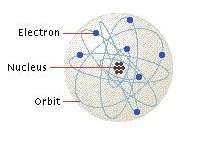
When an electron drops back down from a higher energy orbit to its ground state, it doesn’t just disappear. It has to get rid of that extra energy. It does this by spitting out a photon, which is essentially a packet of light. You see this physics in action all the time. Think about the heating coils in a toaster turning bright red. That red glow isn’t magic. It’s atoms excited by heat, releasing red photons as their electrons settle back into place. An excited electron holds more energy than a relaxed one. To get up there, it absorbed energy. When it falls back down, it releases that same amount of energy as light. The wavelength, or color, of that photon depends entirely on the energy gap the electron crossed.
Living things use energy. Engines use energy. Even a rocket uses energy. Wherever you have energy consumption, you have waste heat. That heat jostles the atoms in an object, causing them to fire off photons in the thermal-infrared spectrum. It’s a direct link. The hotter the object, the shorter the wavelength of the infrared photon it emits. Push that heat high enough, and the object starts glowing in the visible spectrum. It goes from an invisible infrared heat signature to a dull red glow, then orange, yellow, blue, and eventually white. If you want to dig deeper into the mechanics of photon emission, you can look into how lasers work or how light bulbs function. But night vision and thermal imaging rely on this specific behavior of infrared emission.
The Mechanics of Thermal Detection
Thermal cameras don’t see visible light like our eyes do. They detect the infrared radiation that all objects above absolute zero emit. This is why thermal imaging is useful in total darkness or through smoke. The camera converts these invisible infrared waves into an image we can see.
Different materials emit heat differently. This is measured by something called emissivity. A shiny metal surface might reflect infrared radiation rather than emitting its own, making it appear cooler on a thermal camera than it actually is. This is a common pitfall when using thermal imaging for troubleshooting. You might miss a hot electrical connection because the casing is too reflective. Matte surfaces, like wood or plastic, emit heat more accurately and show up clearly.
The resolution of a thermal image isn’t about pixels in the traditional sense. It’s about temperature sensitivity. A good thermal camera can detect differences as small as 0.05 degrees Celsius. This sensitivity allows you to spot a heat leak in a wall or a malfunctioning component in a server rack. The technology is mature, but it’s not foolproof. Environmental factors like humidity and ambient temperature can affect readings. You have to account for the surroundings.
How Thermal Cameras See Heat
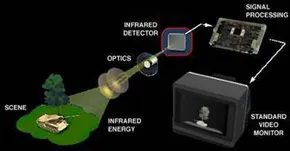
You’ve likely seen the colorful heat maps in movies or news reports, but the actual mechanics are surprisingly fast. It starts with a special lens. This lens grabs the infrared light radiating from every object in the frame. It’s not magic. It’s just physics focusing energy.
That light hits a phased array of detector elements. Think of it as a grid. These sensors build a detailed temperature map known as a thermogram. The whole process takes about one-thirtieth of a second. Thirty seconds? No. Thirty-thousandths. It’s nearly instant.
This data comes from thousands of individual points in the field of view. Each point matters. The detectors don’t just see “warm” or “cold.” They see precise variations. This temperature pattern gets converted into electric impulses. The raw data isn’t useful yet. It needs translation.
Those impulses travel to a signal-processing unit. This is a circuit board with a dedicated chip. The chip works to turn raw sensor data into something a human can understand. It processes the information from the elements. It prepares it for the screen.
Finally, the display lights up. The image appears using various colors based on infrared intensity. Hotter spots might be white or red. Cooler areas could be blue or black. The combination of all impulses from all elements creates the final image. You’re looking at a live snapshot of heat.
Why does this speed matter? In emergency response, that one-thirtieth-of-a-second window can mean the difference between finding a victim and walking past them. In industrial maintenance, it catches a failing motor before it burns down a factory. The tech is simple. The application is critical.
“The thermogram created by the detector elements is translated into electric impulses.”
The hardware is becoming cheaper. Smartphone attachments now use similar principles. You don’t need a military-grade rig to see heat signatures anymore. The barrier to entry is dropping.
But there’s a limit. Resolution. Standard thermal cameras often have much lower pixel counts than visible light cameras. They show you where the heat is. They don’t always show you what it is clearly. A blurry blob of red could be a person. It could be a hot pipe. Context is everything.
Signal processing has improved though. AI is helping chips identify shapes within the heat data. This reduces ambiguity. You get a clearer picture faster. The next generation of these devices won’t just show temperature. They’ll interpret it.
Where does this go next? Smaller sensors. Higher resolution. Cheaper entry points. The tech is moving from specialized tools to everyday accessories. You might wear it. You might carry it. The way we see the world is shifting toward the invisible spectrum.



Uncooled vs. Cooled Sensors
Most thermal cameras refresh their image at 30 frames per second. That speed is standard. The temperature range they cover is wild. You are looking at -4°F to 3,600°F. That is -20°C to 2,000°C. They catch tiny shifts, usually 0.4°F. Some catch 0.2°F. The hardware behind that math falls into two camps.
Uncooled detectors are what you will see everywhere. The sensor sits at room temperature. There is no noise. It powers on instantly. The battery is built into the body. You get the image. It works.
Cryogenically cooled sensors are a different beast. They cost more. They break easier if you drop them. The elements are sealed and cooled below freezing. Why? Resolution. Sensitivity. These systems detect a 0.2°F difference from over 1,000 feet away. That is 300 meters. At that range, you can tell if a person is holding a gun. That level of detail costs extra.
Image Enhancement Technology
Thermal imaging works well in total darkness. It also spots people easily. But most night-vision gear uses image enhancement. It is not the same thing.
Image enhancement takes available light. It makes it brighter. It does not see heat. It sees photons. Thermal imaging sees infrared radiation. The difference matters when you are choosing equipment.
If you need to read a sign in the dark, image enhancement helps. If you need to find a body in a field, thermal helps. They serve different purposes. The technology splits the market in half. One side looks for light. The other looks for heat.
How Image Enhancement Actually Works
When you hear “night vision,” you’re likely picturing that classic green glow. That’s image enhancement, technically known as night-vision devices (NVDs). These systems don’t create light. They steal what’s already there—ambient starlight, moonlight, or near-infrared radiation—and amplify it until your eyes can see it.
The magic happens inside the image-intensifier tube.
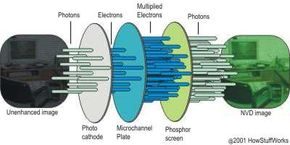
It starts with the objective lens. This front-facing glass gathers photons from the environment. Most of these are in the visible spectrum, but the tube is sensitive enough to catch some near-infrared light too. Once collected, the light hits the heart of the device: the image-intensifier tube itself.
Powering this beast usually requires two N-Cell or AA batteries. The tube’s internal circuitry steps this up to about 5,000 volts. That high voltage is what drives the electron multiplication process.
Inside the tube, a photocathode waits. When photons strike it, the photocathode converts that light energy into electrons. It’s the first step in turning light into a visible image.
But one electron isn’t enough. The system needs thousands.
That’s where the microchannel plate (MCP) comes in. Think of it as a microscopic sieve. The MCP is a tiny glass disc embedded with millions of hair-thin holes, created using fiber-optic tech. It sits in a vacuum, sandwiched between metal electrodes. Each microchannel is roughly 45 times longer than it is wide.
Here’s the trick. When electrons from the photocathode hit the first electrode, the 5,000-volt burst accelerates them into the glass microchannels. These channels are angled slightly—between 5 to 8 degrees—to ensure electrons slam into the walls rather than passing straight through.
This impact causes cascaded secondary emission. The collision excites atoms in the glass, knocking loose more electrons. Those new electrons collide with more atoms, creating a chain reaction. A few electrons enter; thousands exit. The MCP multiplies the signal by a factor of thousands without distorting the image.
At the end of the tube, these amplified electrons strike a phosphor-coated screen. The electrons maintain their spatial alignment with the original photons. This preserves the image integrity. The energy excites the phosphors, which then release their own photons.
Human eyes are most sensitive to green light. That’s why the resulting image is green. It’s not arbitrary. It’s biological.
Finally, the ocular lens magnifies and focuses this green phosphor image for the viewer. You can look directly through it. Or, in more advanced setups, the signal is routed to an electronic monitor or display.
Generations
The technology hasn’t stayed static. The military and commercial markets have evolved the image-intensifier tube into distinct generations. These aren’t just marketing labels. They represent real leaps in sensitivity, resolution, and durability.
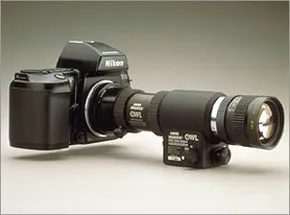
Night-vision technology has existed for over 40 years. The industry sorts these devices into generations. Each major leap in capability marks a new tier.
Generation 0: Active Infrared
Generation 0 systems are the ancestors of modern night vision. The U.S. Army developed them for World War II and the Korean War. They rely on active infrared. This setup requires an IR Illuminator attached to the device. The illuminator projects near-infrared light. It works like a flashlight, but the beam is invisible to the naked eye.
The light bounces off objects and returns to the lens. Inside the tube, an anode and cathode accelerate electrons. This approach has flaws. Accelerating electrons distorts the image. It also shortens the tube’s life. The military strategy failed quickly. Hostile nations duplicated the technology. Enemy soldiers used their own NVDs to spot the IR beam. Being seen was a liability.
Generation 1: Passive Starlight
Generation 1 moved away from active projection. It uses passive infrared. The U.S. Army called this Starlight technology. It gathers ambient light from the moon and stars. This augmented the natural reflected infrared in the environment. No projected beam was needed. This offered stealth advantages.
There were downsides. These devices struggled on cloudy or moonless nights. They lacked sufficient ambient light. Technically, they used the same image-intensifier tube as Gen 0. Cathodes and anodes were still present. Image distortion persisted. Tube life remained a concern.
Generation 2: The Microchannel Plate
Generation 2 brought significant hardware upgrades. Resolution and performance improved over Gen 1. Reliability increased substantially. The standout feature was the ability to operate in extremely low light. Even a moonless night was manageable.
The key addition was the microchannel plate (MCP ) in the image-intensifier tube. The MCP does not just accelerate existing electrons. It increases the total number of electrons. This amplification creates brighter images. Distortion is significantly reduced compared to earlier generations.
Generation 3: Gallium Arsenide
Generation 3 is the current standard for U.S. military operations. The underlying technology resembles Gen 2. Improvements are subtle but impactful. Resolution and sensitivity are higher.
The photo cathode is now made of gallium arsenide. This material is highly efficient at converting photons to electrons. It also uses an ion barrier on the MCP. This coating dramatically extends tube life. The image quality is sharper.
Generation 4: Filmless and Gated
Generation 4, often called “filmless and gated” technology, offers major improvements. It excels in both low and high light environments. The ion barrier on the MCP was removed. This reduction in background noise enhances the signal-to-noise ratio. More electrons reach the amplification stage. Images are brighter and less distorted.
A critical addition is the automatic gated power supply. This system switches the photocathode voltage on and off rapidly. The NVD responds to lighting fluctuations instantly. Users can move from bright to dark environments without being blinded.
Consider the movie trope where an agent goes blind when a light is turned on. Gen 4 NVDs eliminate this halting effect. The response is immediate.
Buying Advice and Standards
Many “bargain” scopes use Generation-0 or Generation-1 tech. Expect disappointment if you want professional-grade sensitivity. Generation-2, Generation-3, and Generation 4 devices are expensive. They last longer if cared for properly. Any NVD can use an IR Illuminator in areas with almost no ambient light.
Not all tubes are created equal. Every image-intensifier tube undergoes rigorous military testing. Tubes that meet requirements are MILSPEC. Those that fail in even one category are COMSPEC. Knowing the difference matters when comparing specs.
Scopes vs. Goggles vs. Cameras
You have to pick your poison when it comes to night vision hardware. The industry generally splits devices into three buckets.
Scopes are handheld or weapon-mounted. They are monocular, meaning you look through one eye. This is useful because you can lower the device and return to normal daylight vision instantly. You don’t have to wait for your eyes to adjust after staring into a green tube.
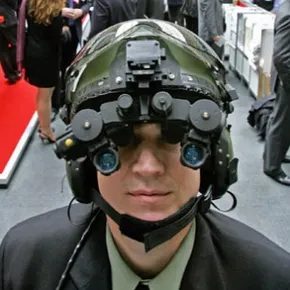
Goggles are usually head-worn. They are binocular, giving you two-eye depth perception. Some use a single lens system, others stereo lenses. If you are moving through a dark building or tracking game in the woods, constant viewing is key. Goggles win here.
Cameras tell a different story. They output to monitors or record directly to storage. Think permanent installations on buildings or helicopters. Many modern camcorders bake this tech right in. It is about documentation and surveillance, not just looking.
Why We Need Night Vision
The original goal was simple: don’t get shot by enemies you can’t see. The military still dominates this space. They use it for navigation, targeting, and surveillance.
But it is not just for soldiers anymore.
Police and security firms use both thermal imaging and image-enhancement tech. Hunters and nature enthusiasts use Night Vision Devices (NVDs) to navigate forests without stumbling over roots. Detectives and private investigators track subjects under cover of darkness. Businesses mount permanent cameras to monitor perimeters.
There is a specific utility in thermal imaging that is almost spooky. It detects disturbance. If someone dug up a patch of ground to bury drugs, money, or a body, the thermal signature of that disturbed earth is different from the surrounding soil. You don’t need to see the hole to know it is there. Changes to walls or structures show up as temperature anomalies. This has solved cases where nothing looked wrong to the naked eye.
The FAQ Reality Check
People ask the same questions. Here is what the data actually says.
Do night vision goggles work in total darkness?
Yes. They rely on thermal energy. They register heat from objects around the camera or eye. No ambient light is required.
Can you get night vision on your phone?
Sort of. There are Android apps like “Night Vision Camera” that enhance low-light photos. They are software tricks, not true optical night vision. But they significantly improve the experience.
How far can night vision binoculars see?
Range matters. Most standard binoculars give good output up to 800 feet. Beyond that, it gets grainy. Check the specs before you buy.
Are night vision goggles legal in Canada?
Gen 1 and Gen 2 devices are legal. This includes monoculars and rifle scopes. You can own them. Just don’t use them to harass people.
How good is human night vision?
We are diurnal. Our eyes are built for daylight. We are terrible at night. Nocturnal animals have us beat every time.
The Bottom Line
The world changes after sunset. It is a different ecosystem. If you camp or hunt, a device is probably worth it. Just make sure you pick the right type for the job.
Special thanks to ITT Industries, B.E. Meyers & Co., and Infrared, Inc. for their assistance.